 Boring Log Viewer
Samples, specimens and tests
How samples, blow counts, recovery and laboratory results are entered and drawn.
The data distinguishes samples from specimens as follows:
- A sample is what came out of the ground: an SPT, a Shelby tube, a core run. It has a depth interval, a sampler type, blow counts, recovery and remarks.
- A specimen is a piece trimmed from a sample. Laboratory tests (water content, unit weight, Atterberg limits, fines content) are performed on specimens. Many specimens are often trimmed from a single sample.
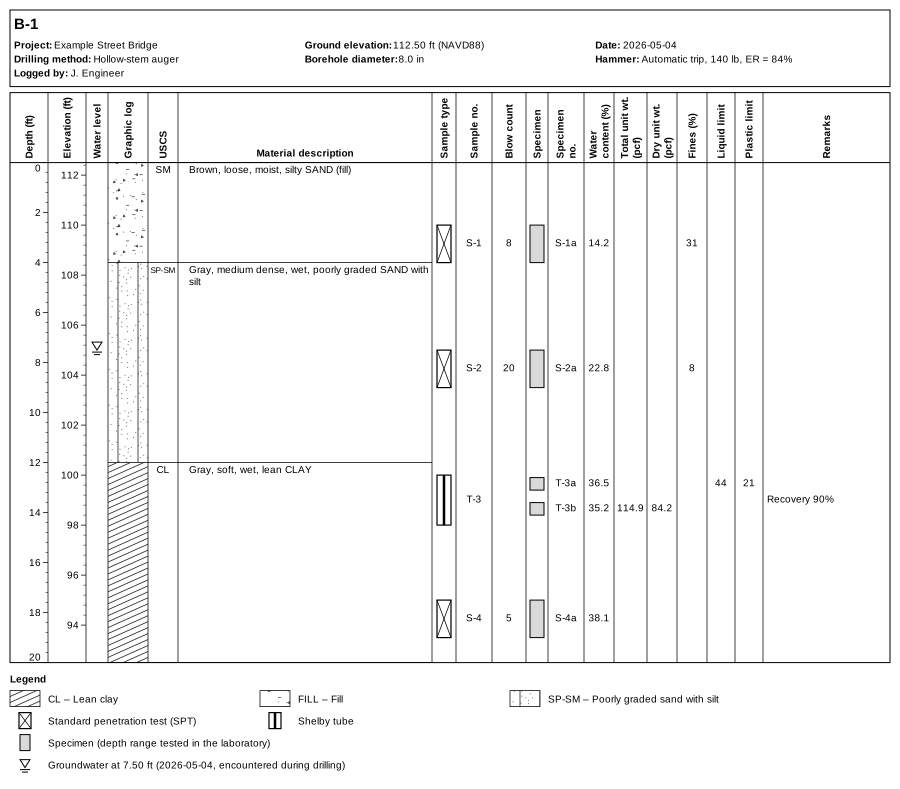
step2-samples.json. Click to open full size.In the example above, sample T-3 (a Shelby tube) has two specimens, T-3a and T-3b, each drawn as a grey box at its depth in the Specimen column with its results on its own row. The tube's recovery is noted in the remarks.
Sample depth interval
Each sample has a top and bottom depth: the interval through which the sampler was driven or pushed. The sampler symbol is drawn over that interval, and the sample's values (number, blow count) are aligned with the sample center.
- For an SPT, the sample length is the full 18 in (0.45 m) drive, e.g. 10.0 to 11.5 ft.
- For a Shelby tube or core run, the sample length is the length pushed or cored, and the recovery is given in
recovery_percent. - When a sample reaches refusal, use the depth actually reached, e.g. 13.0 to 13.3 m for 50 blows in 5 in.
Sampler types
A sample's type is defined by one of these codes (spelled exactly as shown), and the sampler symbol is selected based on its type. Without a type, the sample is drawn as Other.
SPTStandard penetration test (SPT)ModCalModified CaliforniaDamesMooreDames & Moore (ring-lined)ShelbyShelby tubePistonPiston samplerOsterbergOsterberg (fixed piston)PitcherPitcher barrelDenisonDenisonLargeDiameterLarge-diameter samplerBlockBlock sampleDirectPushDirect push (e.g. dual tube)GelPushGel pushSonicSonic coreCoreRock coreTripleTubeTriple-tube coreBulkBulk sampleGrabGrab sampleCompositeComposite sampleAugerAuger cuttings or hand augerTrenchTrench or test-pit sampleDisturbedDisturbed or remolded sampleOtherOther sampler
You can replace any of these symbols with your own, or add new sampler types; see Your own hatches.
Recovery and no recovery
recovery_percent is the recovered length as a percent of the sample interval (top to bottom). A Shelby tube pushed 2.0 ft that recovered 1.8 ft has "recovery_percent": 90. It's shown as a note at the start of the sample's remarks: "Recovery 90%". A recovery of 0 is shown as "No recovery".
Earlier versions took recovery as a length. Such data is still read: the length is converted to a percent of the sample interval, with a warning.
No recovery is an outcome, not a kind of sampler. Give the sampler that was tried as the type, and "recovery_percent": 0:
{ "top": 25, "bottom": 26.5, "name": "S-6", "type": "SPT", "blow_count": 12, "recovery_percent": 0 }Older data often marks it differently. A sample whose type is "NoRecovery", or whose type or name is "No recovery" or "NR", is read as "recovery_percent": 0, with a warning, and drawn as Other (or its given type).
Blow counts
There are two fields, and you can give either or both:
blow_countis the value you want shown in the blow count column: a number such as14(an SPT N-value, or blows per foot for another sampler), or text for refusal, such as"50/5in"or"50/150mm".blowsis the list of blows per increment, such as[6, 8, 10]for an SPT's three 6 inch increments.
If you give blow_count, that's what is shown. If you give only blows, the increments are shown joined with dashes: 6-8-10.
The viewer doesn't correct blow counts for energy, overburden or sampler type. A Modified California blow count is shown as recorded, not converted to an SPT N-value. We really shouldn't be using Modified California samplers, but we still do (especially in southern California), so they're included in this boring log viewer, unfortunately. Put corrected values in remarks, or in a custom column, if you need them on the log.
Energy ratio. Give the hammer's energy ratio in metadata.energy_ratio; it's shown in the header as "ER = 82%". If it varies between samples, give energy_ratio on each sample and add the energy_ratio column, which isn't shown by default (see Columns and layout).
Specimens and laboratory results
Put laboratory results in the sample's specimens list:
{
  "top": 12.5, "bottom": 14.5, "name": "T-3", "type": "Shelby", "recovery_percent": 90,
  "specimens": [
    { "name": "T-3a", "top": 12.6, "bottom": 13.1,
      "water_content": 36.5, "liquid_limit": 44, "plastic_limit": 21 },
    { "name": "T-3b", "top": 13.6, "bottom": 14.1,
      "water_content": 35.2, "total_unit_weight": 114.9, "dry_unit_weight": 84.2 }
  ]
}| Specimen field | Column | Units |
|---|---|---|
name | Specimen no. | text |
top, bottom | Specimen (the grey box) | length |
water_content | Water content (%) | % |
total_unit_weight | Total unit wt. | unit weight |
dry_unit_weight | Dry unit wt. | unit weight |
specific_gravity | Specific gravity | – |
fines_content | Fines (%) | % passing No. 200 sieve |
liquid_limit, plastic_limit | Liquid limit, Plastic limit | % |
nonplastic | "NP" in both limit columns (any limits given are ignored) | true/false |
uscs | Lab USCS: the symbol from the specimen's laboratory classification | USCS symbol |
remarks | Remarks, level with the specimen | text |
custom | Your own columns, e.g. { "cu": 45 }; see custom columns | as you choose |
- Depths. A specimen with a
topandbottomis drawn as a box over that range, and its results row is level with it. With only atop, it's drawn at that depth. Without atop, no box is drawn (none is made up from the sample) and its results are shown level with the sample. - Several specimens each get their own row, so one sample can show several sets of results. Overlapping specimens are drawn side by side.
- A specimen outside its sample's interval gets a warning. A
bottomabove thetopis an error. - Dry density isn't a field: convert it to unit weight first (multiply Mg/m³ by 9.81 to get kN/m³). The AGS4 and DIGGS imports do this for you.
Unit weight of a whole sample
A sample's unit weight is sometimes measured on the whole sample, for example by weighing a Shelby tube before it is extruded. Give it on the sample itself, with no warning. It's shown in the Total unit wt. and Dry unit wt. columns, level with the sample, without a specimen box; results on specimens cut from the same sample keep their own rows.
{ "top": 12.5, "bottom": 14.5, "name": "T-3", "type": "Shelby", "total_unit_weight": 116.2,
  "specimens": [ { "name": "T-3a", "top": 12.6, "bottom": 13.1, "water_content": 36.5 } ] }
Results on the sample (older data)
Earlier versions put laboratory results directly on the sample ("water_content": 22.8 next to "blow_count"). That's still accepted, with a warning, and the values are shown level with the sample, without a specimen box. To update such data, move the values into a specimen with the sample's depths:
{ "top": 7.5, "bottom": 9, "name": "S-2", "type": "SPT", "blow_count": 20,
  "specimens": [ { "top": 7.5, "bottom": 9, "water_content": 22.8, "fines_content": 8 } ] }
Remarks
A sample's text goes in remarks: "Refusal on cobble", "RQD 45%", "Poor recovery". They're shown in the Remarks column, level with the sample, after the recovery note. Each specimen's remarks are in the same column, level with the specimen.
Samples used to have a description as well. It's still accepted, with a warning, and shown at the start of the remarks.